How To Process Photos and Videos from Digital Camera
Written by Pavan Kumar on September 3, 2009
At first, let me make it clear that this post is not from a designer point of view, but the way of thinking of any normal computer user. If you have observed photos and videos taken from high quality digicams, they occupy a lot of space on your hard disk. These days, cameras have been way cheap and every hobby photographer goes and picks the high resolution cameras like starting from 7 mega pixels.

Such high resolution photos and images are really good, but at the same time they have few disadvantages. Check out the best digital cameras – they are indeed wonderful gadgets available at not so high price. But also have a look at the images / videos they produce – an image would be some 4000 pixel width and 3MB size or a 5 minute video clip shot can be 500 MB. Don’t believe in stats? Check out the images below. Don’t you think its too high to handle on your system / thumb drives / optical media? Here is how to process them in simple and easy ways using free softwares.
1. Image processing for photos from high end digital cameras
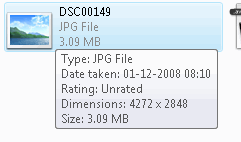 Those 4000px pictures not just take your hard disk space (you can fit only 200 such photos on a single CD), but also they render processing slow on your systems especially if your graphics support is low. Use multiple image resizer software to resize every image to whatever size you need. May be your monitor size or a high resolution of 1600 * 1200px would be great both for quality and file size. If you publish them on your website, use web image optimization. Always try to keep web images in terms of 10-40kb or so and never exceed 100kb.
2. Video processing for high quality videos from digital cameras / handy cams
 Recently I got a clip from friend which was shot with Canon PowerShot SX110 IS, it was a a great quality video and played very well without any dots on a 34” TV. The problem was it could not be played well using my regular player software even though I have all codecs installed, the voice was absent and video used to struck after playing few seconds. Only after reduction of quality I could watch it well, here I have to admit my laptop is not so good at graphics as I don’t require much, but rest of the configuration is great for my needs. Make use of this free video format converter which is capable of converting from and to any popular video format. This also saves a huge amount of space on your storage media.
Additional tip: If you are the photographer who use camera, try using the camera in low resolution/ low quality mode for normal usage. Even the low quality would work great for viewing on computers / taking a 4 * 6” photo print.
Also read: Convert Windows Movie Maker project to video format, Download free logo maker software
People who liked this also read:


0 Readers responded to this post
1 Blog responses for this post
Leave Your Comments Below / Trackback